Showing posts with label beforeandafter. Show all posts

Tuesday, September 16, 2014

Master Bath Renovation Last Year

I've been checking my old posts, and I can't believe I didn't blog about my huge project last year of helping a delightful couple remodel their master suite!  When I visited them in January of 2013, the bathroom looked like this:

Before

Before
That terra cotta paint on the walls makes me chuckle every time I see it!  I used a very similar color on my first remodeled bedroom when I was a teenager in the 90s, and here in this bathroom it looks so garish in these pictures! Ugh!

The client's biggest problem with the space was the garden tub, the small shower, and the big empty space in middle of the room.  I spent weeks just sending them options for how to move the walls.

Final Floor Plan, After 12+ Iterations!

The materials and finishes board that I created for them was a home run and the perfect road map during construction.  My client loved the rug that I chose, but requested the light fixture pictured.  I had no problem fitting that in!
Materials and Finishes Board

The construction process is always a leap of faith for homeowners.  It's uncomfortable, noisy at times, and lots of little decisions have to be made.  I was there to help with tile choices, carpet selection, tub placement, ordering a custom bookcase, and finding a chair that would not be too expensive.

Tile Choices at the best prices

Here I am working to add all the finishing touches: shelf spacing, art, towels on hooks:


Me--Hanging Art
Me--Deciding on Shelf Accessories

And--AND my clients are so happy with the finished product!  Check it out:

Larsen Interiors, LLC

Larsen Interiors, LLC

Larsen Interiors, LLC

Larsen Interiors, LLC


Larsen Interiors, LLC


Larsen Interiors, LLC


Larsen Interiors, LLC


 It is always a little sad for me to finish a project, and to leave the family that I have gotten to know so well.  I love this family of three boys (just like me!).  Very special people!

Friday, November 22, 2013

The Sitting Room

 I had the chance on Tuesday to work (all day) on the sitting room--a room off of our kitchen.  The best thing about the sitting room is my boys!


We use the room throughout the day, and now when I look at it, I feel welcomed by the art that we now have on the walls!  Hurray for art!

Can't believe that when we bought the house, the room used to look like this:

our sitting room, Labor Day 2011

Monday, August 26, 2013

My 1960s Ranch House


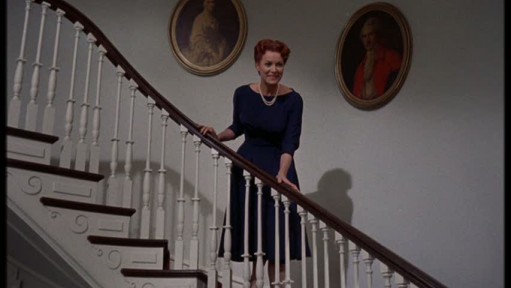
I live in a home that is like a mix from the two homes in the "Parent Trap" movie: a modern 1960s ranch that has horizontal lines, huge guillotine cut stone fireplace, but with colonial window boxes, stair railing and stain glass front door.  Decorating it has become sort-of an identity crisis!

townhouse-Maureen O'Hara staircaseRanch-kitchen
http://hookedonhouses.net/2010/01/31/the-original-parent-trap-two-sisters-two-houses/

The challenge I am having right now is how to blend what I want to do to the living room, which mostly has nothing to do curb appeal, and blending what we use for window treatments on 3 HUGE picture windows that have a LOT to do with our curb appeal--especially now that we've ripped out the bushes and trees.

Progress

Have you ever thought about what interior window treatments looks like from the outside?  Sometimes, the curtains/shutters/shades can really TAKE AWAY from the exterior of a home.

Basic Brick Ranch - need curb appeal suggestions!, This is our basic boring ranch...weve since painted the shutters black.  Any other suggestions on colors or things to add curb appeal???, Home Exterior Design
http://www.roomzaar.com/rate-my-space/Home-Exterior/Basic-Brick-Ranch---need-curb-appeal-suggestions/detail.esi?oid=522526

But other times, the curtains/shutters/shades can really ADD to the exterior of a home.

how-to-add-curb-appeal-to-your-ranch-house
http://retrorenovation.com/2009/04/10/17-ideas-to-add-curb-appeal-to-your-40s-50s-or-60s-house/

With a ranch home, you really want to work with the modern feel that your home has.  EVERY ranch home has a Prairie style (think Frank Lloyd Wright) influence to it.  Frank Lloyd Wright had a love of nature and technology.  In fact--I believe he used technology to relate more to nature.  You can see this in the ranch homes replicated over and over again throughout the country: low horizontal lines (meant to relate more to the landscape), heavy set chimneys, sheltering overhangs, open floor plans, lots of windows.  To have a ranch home from the 1950s or 1960s is to have a little piece of history nodding it's hat to the FLW influence--like this home from "North by Northwest" where the studio had a matte painting exterior and a sound stage built interior to look like FLW had designed it (because they couldn't afford his fee to have him actually design it):


The windows in our living room need to look out on nature and also need to have a spare/modern feel to them.  The view from Mt Olympus is right out those windows!  Whoever chose those windows knew that view what important--and I don't want to cover it up.  But how to protect our newly-refinished wood floors and how to protect our privacy at night?  I hope someday this corner of the living room looks as inviting as this:

http://smallhousebliss.files.wordpress.com/2012/11/carney-logan-burke-fish-creek-guest-house-bedroom-via-smallhousebliss.jpg?w=820&h=615

I've just about talked Jon into roller shades as the solution.  They would allow us an unfiltered view of our yard (which someday won't create spontaneous yard work lists in our heads every time we look at it) and Mt Olympus, we can pull them down at night for privacy, AND they wouldn't be too expensive for 3 windows that are so large.
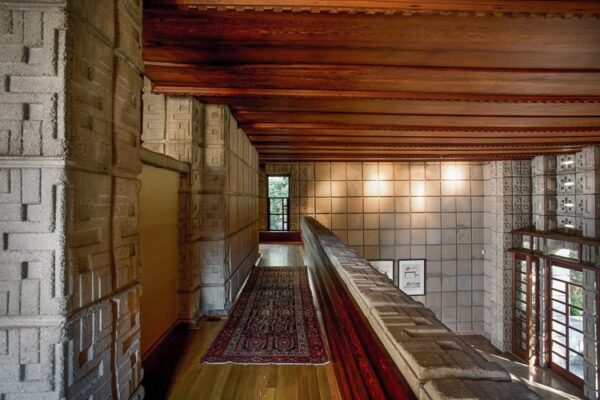
One of these days I will be able to pull down my old lady sheers (that I bought as a quick way to protect our wood floors from sun damage) and numerous curtain panels, and decorate the room as it was meant to be: with a FLW influence.

Frank Lloyd Wright Millard House mezzanine hall with persian rug
FLW 1923 Millard House in Pasadena

Thursday, December 27, 2012

I'm Back and Designing my Laundry Room!

Before I perfectionize so much that I don't even post this, here is my latest design of our laundry room!!


If I still like this design in a few days, then I will be ready to get bids from my electrician, sheetrocker, and flooring salesman (my dad) in order to forge ahead.  Wahoo!  My only concern is that I haven't come close to adding anything that I like from my inspiration photo:

mapleleavessycamoretrees.com, "Laundry Rooms"

The room is still bare to the studs--including the ceiling--except for one wall.  There is mismatched furniture to hold overflowing sewing and laundry supplies.  The floor is still bare concrete:


We will need to:

1. wire outlets and lighting
2. remove the last framing left from an old stand-up shower
3. frame the back wall along the foundation for sheetrock
4. have the room sheetrocked
5. install baseboards
6. paint
7. install 1960s ceramic top metal enameled sink that came with the house
8. install the 2 base cabinets and counter-top that will go next to the freezer
9. move everything out and have the flooring installed (sealing the asbestos tile)
10. move everything back in, including the freezer and new bookcases

Tuh-da!  Can't wait to get going!!

Monday, July 2, 2012

Master Bath Finished!!

When we bought our house, the master bathroom became our biggest project.  The rocking/unset toilet sent water out through the floor and down into the basement when it was flushed, and the shower was leaking into the basement as well.  The sink had no p-trap on it.

master bath, before

We quickly got to work on the toilet, doing some disgusting detective work.  Jon removed the toilet, and shined a flashlight into the pipe.  We found a ball of old bandages about 4" down.  Yuuuuuuck.  But easy to clean out.

master bath, toilet detective work

Then we gutted the whole thing, saving the sink and toilet and medicine cabinet.

master bath demo

We couldn't believe how much dust and trash the demo made.  We had to take many trips to the dump.  Soon though, we had framed in the second door that went into the kitchen, bought the tile for the shower and floor, had the plumber get the plumbing ready, and an electrician to check over the wiring.  Then our sheetrocker (Dave--he's amazing) took over.  We thought we were nearly there after the tile was installed, but I still had to shop around for the shower glass and install the wainscotting (myself--over Thanksgiving 2011 weekend).  We hoped to end up with this:


But then the bathroom sat.  And sat.  While we worked on the basement, the mud room, the cabinets in the hallway.  And in the meantime, our kids were scared of coming in here because of the hole in the wall for the medicine cabinet.  I didn't like having to dig my blow dryer and brushes out of boxes sitting nearby in our bedroom.


And then, last week Jon and I agreed that the $100 I spent on wallpaper wasn't what we wanted.  So, I mixed up paint from our growing collection to create my own "Behr Silver Drop".  I got rid of 5 paint cans in the process!!!  I love saving money and using up spare stuff in the process!  I cut in around the whole room 2x last Tuesday night, rolled the rest of the paint onto the walls plus hung the medicine cabinet on Wednesday, aired out the room on Thursday and Friday, and then we hung the storage cabinet and art on Saturday--as we drum rolled with our 9 year old.  SO EXCITING!

master bath, before


Our next project for the month of July is the master bedroom.  Hurray!

Friday, January 6, 2012

Our New House, "Before" Pictures

We first walked through our new house on Labor Day a few months ago.  I am so happy to be sitting on this end of the timeline!!  We were so excited to buy this home, and we are still very glad that we did.  But there has been a lot of work in between this day we took pictures and from where we are today.  I've thrown in some more pictures from the day we took possession of the house, so that the other areas of the house are also represented:


street view


the entry

formal living room

formal dining room

sitting room off of kitchen

kitchen

hall bath

1st bedroom

2nd bedroom

master bedroom

master bath

basement family room

basement reading nook


basement storage

huge basement bedroom

basement hallway

basement bath

basement kitchen with garage access

attached garage

backyard with covered patio

"Progress" pictures coming soon . . .